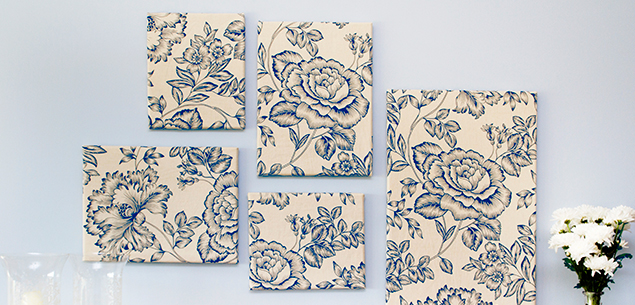
If you need to fill an empty space on your wall or just brighten a room, this is the DIY project for you! You’ll have instant glam at a fraction of the cost of “real” art – you just need to find the right fabric.
What you need:
Canvases
Fabric
Scissors
Staple gun, stapler or small tacks and a hammer
Hanging strips (I use 3M)

Place your canvases on the fabric and cut around.
- Iron your fabric, then lay it out, print-side up. Place your canvases on the fabric over the top of the part of the print you want to use, then cut around them, allowing an extra 5-6cm of overhang material.

Staple or tack the fabric to the frame.
- Flip your cut-out fabric over and position the canvas over the top. Trim off any excess overhang. Staple or tack the fabric to the frame along one of the longer sides. Pull the fabric firmly along towards the other long side, then staple or tack down.

Pull the fabric in the corner towards the centre of the canvas.
- Pull the fabric in the corner firmly toward the centre of the canvas and staple down. Fold the corner over neatly, stapling to finish.

Fold the fabric down and staple in place.
- Fold the fabric down along the shorter edges, pulling firmly and staple down.

Attach hanging strips to the back of the frame.
- Attach hanging strips to the back upper corners of the canvas.
Tip: The best sort of fabric for this project is one with a large print, as a smaller print will get lost on bigger canvases. Furnishing stores and curtain fabric departments are the best places to find these.
By Alice Arndell.